
Speech Filing System
Introduction to SFSWin
SFSWin is a shell program that runs on Windows PCs only. It allows the operation of most of the SFS programs by menu selection and dialogues rather than through the command-line.
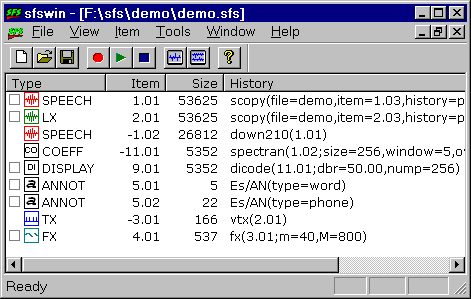
Although SFSWin is a native Windows program, the remaining parts of SFS continue in their 'portable' format: using device independent graphics and supporting Unix and MSDOS as well as Windows.
1. Hardware and Software Installation
To make the best use of SFSWin requires knowledge of the audio configuration of your computer. Before you start, check:
- that the audio output from the computer is connected to speakers or headphones.
- that the microphone-level audio input is connected to a working microphone (if used)
- that the line-level audio input is connected to your tape recorder (if used)
- that the audio input devices are selected and set to a proper recording volume (in the Volume Controls application)
- that the audio output device is selected and set to a proper replay volume (in the Volume Controls application)
You can check recording levels on the record dialogue in SFSWin, using the 'Test Levels' button. All volume levels are set outside SFSWin, using the Volume Control application, which can be found on the Start menu: usually under Programs/Accessories/Multimedia/Volume Control.
SFSWin uses the 'Hypertext Help' format for its documentation and help files. Although this is the new standard format help for Windows computers, many machines do not have this installed. If the SFSWin menu command 'Help/Help Contents' does not display the help file, you will need to run the HHUPD.EXE file included with the SFS installation. Microsoft Internet Explorer version 3 or later is also required.
2. Getting Started
Start SFSWin. You will see an empty SFS file displayed called 'Unknown1'. We will create a signal and store it in this file, then replay it.
- Select menu option Tools/Generate/Test signals. A dialogue box will appear which asks you what kind of signal you would like to generate.
- Click on 'Generate Sinewave' so that a tick appears.
- Set the frequency to 500 (Hertz)
- Click on 'OK'
You will now see an entry in the SFSWin display for the file Unknown1 that says:
SPEECH 1.01 10000 testsig(type=sine,freq=500)
That is: an item of type SPEECH, numbered 1.01, consisting of 10,000 samples generated by the testsig program.
If you click on the replay button, this tone should be replayed. If it doesn't, try replaying from some other application to see if the audio connections are OK and that the output volume is set loud enough.
Let's generate a second tone. This time, set the frequency to 1000Hz. You should see two lines in the display:
SPEECH 1.01 10000 testsig(type=sine,freq=500)
SPEECH 1.02 10000 testsig(type=sine,freq=1000)
You can see that this new item has different parameters listed in the processing history text.
If you click on the replay button, you should hear that it is the original tone that is replayed, not the new one. You can control which item is replayed by using the little check boxes to left of the items on the list. Start by leaving the upper box alone and ticking the second one. The replay button should now replay the second tone - it has a higher pitch. Now tick the first only and replay, now tick both and replay. The replay button replays all speech items that are ticked, or the first speech item if none are ticked.
To display our tones, click on the 'Display all items' button on the toolbar - it is the one just to the left of the question mark button. A new window should open with the graphs of both waveforms. To replay the top waveform, click the left button of the mouse in the y-axis box to the left of the top waveform and press the 'space' key. To replay the lower waveform, click the left button of the mouse in the y-axis box to the left of the lower waveform and press the 'space' key.
To zoom in to a small region of the display, click the left mouse button in the centre of the screen - a vertical cursor will appear at that point. Now position the mouse about 1cm to the right and click the right mouse button - a second vertical cursor will appear. Now click on the menu option View/Zoom In - the display will be redrawn to show the region between the cursors. It should be much more obvious that the lower tone is twice the frequency (i.e. each cyle is half the period) of the upper tone.
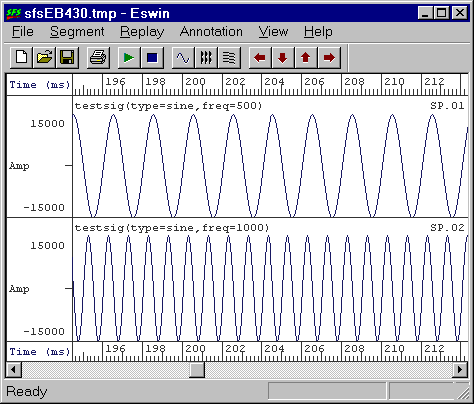
To zoom back out again select the menu option View/Zoom Out. The zoom-in and zoom-out commands are also available as the down and up arrows on the toolbar. For now, quit this program by selecting menu option File/Exit.
Back in SFSWin, you can choose which items are displayed by putting tick marks against them and using the 'Display checked items' button on the toolbar. Try this by checking the first item only and clicking on 'Display checked items' - you should see a display of only the first waveform. Now reverse it by checking the second waveform only then displaying.
Finally, we will save the contents of this file for use later on. From the SFSWin display, select the menu option "File/Save As". Now find a suitable directory and give the file a suitable name, such as "test.sfs". You can now exit SFSWin.
3. Recording
Start SFSWin and click on the record button in the toolbar.
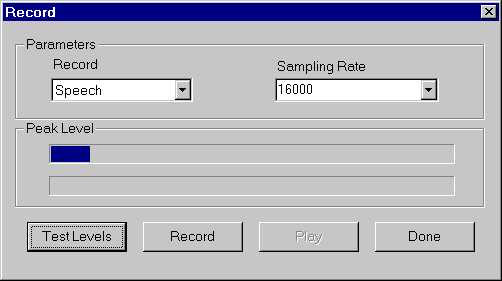
This dialogue box should be displayed. With your microphone connected and switched on, click on 'Test Levels'. You should see the peak level meter change in position as you make noises into the microphone. You should use the Volume Control application to set the sensitivity of the audio input. Ideally, when you speak the peak level meter should not reach the right hand side of the display, although there should be significant movement of the level meter, at least up to half-way on some parts of the recording. When you have set the levels appropriately, click on Stop.
To record a signal click on Record to start and Stop to stop. You can play back what has just been recorded by clicking on the Play button. Once you are happy with the recording, click the Done button.
To change the recording quality you can change the sampling rate. The default rate of 16000 samples/second is usually fine for most speech signal work. However some PCs do not support this sampling rate. If the signal seems to be replaying at the wrong speed, try rates of 11025 or 22050 samples/sec; these are more widespread. Rates higher than 22050 are rarely necessary for speech.
SFSWin will also record a stereo signal into two separate speech items.
4. Basic signal processing
Record a short phrase or load the Windows file "chimes.wav" (select File/Open and locate the file in the Media sub directory of the Windows system directory; select the 'Speech' and 'Link to File' options in the Open Audio File dialogue box).
To perform some simple filtering select the menu option Tools/Speech/Process/Filtering/Low-pass filter. A dialogue box appears requesting the settings to use. Leave the cut-off frequency set at 1000Hz and the number of sections at 4. Click OK and a second speech item will appear in the file. Put a check mark against both items and click on replay. You will hear the original and the low-pass filtered version.
To do high-pass filtering first put a check mark by the original unfiltered speech item only. Then select menu option Tools/Speech/Process/Filtering/High-pass filter. Leave the cut-off frequency at 1000Hz and the number of sections at 4. Click OK. A third speech item is now present in the file. Check all the items and replay them.
The reason we needed to check the first item before applying the high-pass filter is that by default most SFS programs operate upon the last item of the appropriate type in the file. Thus if we had left both items unchecked, we would have high-pass filtered the low-pass filtered signal!
We can show the processing history tree by selecting menu option Tools/Display tree. If you have selected the items correctly for filtering, the result should look like this:
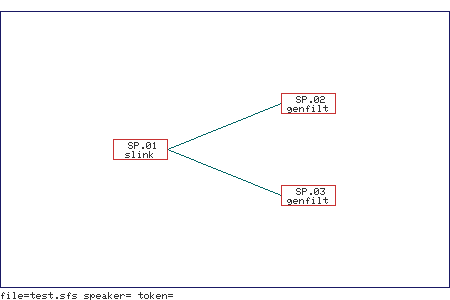
Here you can see graphically that item 1.01 (shown as SP.01) has been processed into two new items: 1.02 (the low-pass) and 1.03 (the high-pass).
5. Spectrum and Spectrogram display
Using the file containing the three signals we built in the last section, we can display spectral cross sections of the various versions.
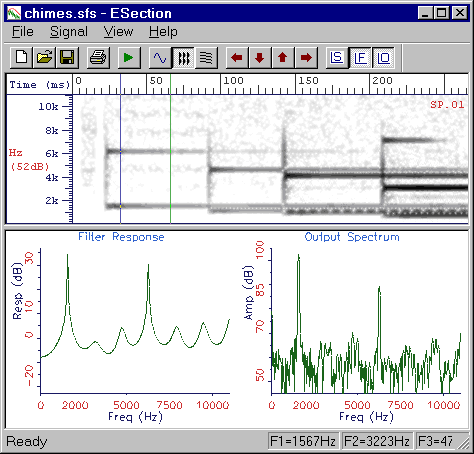
Start by checking the first item only. Select menu option Tools/Speech/Display/Cross section. You should see a display in two parts, with the original waveform at the top and two graphs below. To calculate and display a spectrum of a short section of waveform, place two cursors on the waveform using the left and right mouse buttons. This region is then analysed and the spectra displayed in the bottom window. The filter response graph is based on an LPC analysis of the signal, useful for finding formant values from vowel sounds.
Quit this program and bring up spectral cross-sections of each of the other two items in the file in turn. Do this by checking the selected item and picking the Cross section menu option. Confirm that the filtering has done its job!
You can display spectrograms of the various signals very simply. Leave all items unchecked for now. Choose menu option Tools/Speech/Edit, this will bring up a dialogue box in which the option "Display speech as waveform" will be checked. Remove this check mark and check "Display speech as wide-band spectrogram" instead. Click OK. A display containing the three signals analysed in the form of a wide-band spectrogram will appear. You can use the cursors for zoom and replay as before.
You can display cross sections and spectrograms simultaneously with menu option "Tools/Speech/Display/Cross section (spectrogram)".
6. Item Deletion
For the next part of our tour, we show how deletion works. For this we will process the high-pass filtered signal (1.03) one more time and then delete it.
Check item 1.03 only and select menu option Tools/Speech/Process/Filtering/Low-pass filter. Change the cut-off frequency to 2500Hz and click OK (earlier we had high-pass filtered at 1000Hz, so the result will be a band-pass between 1000 and 2500). A fourth speech item will appear. Now put a check mark against item 1.03 again and select menu option Item/Delete. A message box will ask if you are sure, reply OK. The display will now look like this:
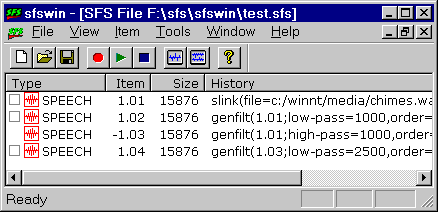
Note that although item 1.03 remains in the list, it no longer has a check box next to it and it cannot be selected nor displayed. It really has been deleted although a record of it is kept in the file. The tree display shows what has happened:
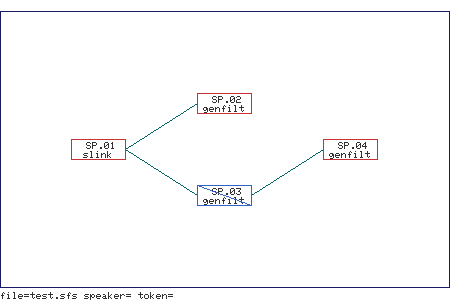
The diagonal line through item 1.03 (SP.03) is an indication that the data associated with this item has been removed, although its history is maintained so that we are able to determine the complete processing history of item 1.04.
If we delete item 1.04, you will find that this record (of 1.03) also gets deleted.
7. Other Data Types
As well as SPEECH items, many other types of data may be stored in SFS files. The following demonstrates some of these: the Fundamental frequency item (FX), the Coefficient item (CO) and the display item (DI).
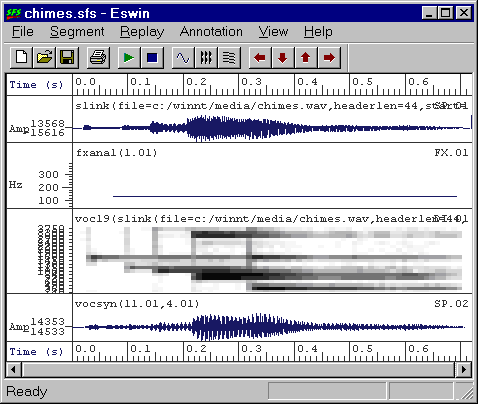
To calculate a fundamental frequency track, start with a file containing just a speech signal (or 'chimes.wav'). Then put a check mark next to the item and select menu option "Tools/Speech/Analysis/Fundamental frequency track". A window will appear while the processing is being performed, and once complete a new item (4.01) will appear in the file, of type FX ("frequency of excitation"). If you now display the file, you will see both a waveform and the fundamental frequency track.
We now calculate a set of spectral coefficients from our signal file. We choose to use a 19-channel filterbank analysis which gives us 19 frequency values between 0 and 5000Hz every 10ms. Checkmark the original speech signal and select menu option "Tools/Speech/Analysis/Filterbank/19-channel auditory filterbank". After a brief amount of processing, a new item (10.01) of type COEFF will appear in the file.
The display of the spectral coefficients item is not very clear. To convert coefficients to a greyscale display, select menu option "Tools/Coefficients/Make grey scale version", and accept the default parameters. A new item (9.01) of type DISPLAY will appear in the file. Display the speech waveform and the display item by checking them both and choosing "Display checked items" from the toolbar.
Finally we will attempt to recreate the speech signal from the spectral coefficients through the use of a 19-channel filterbank synthesizer. Select the FX item and the CO item and choose menu option "Tools/Coefficients/19-channel synthesis". A new speech item will be created, which will sound a bit like the original signal(!). Display the SP, FX and DI items to get this:
You should by now be able to interpret this processing history tree:
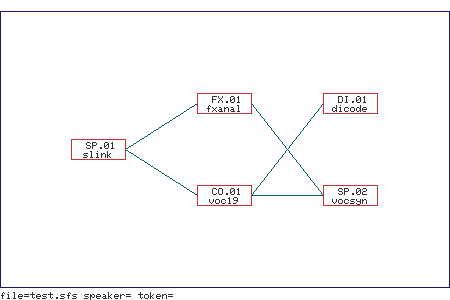
It shows how the coefficient data, calculated from the original speech signal, was used to produce both a grey-level display and (along with the Fx) a new synthetic speech signal.
8. Where next?
The sheer number of different programs in SFS is daunting to the newcomer. You can find a list of each of them in the help documentation. You will find that section 4 of the users' manual gives some more ideas about which programs are useful for what.
Also note that each dialogue box contains a help button linked to the manual page for the appropriate program.
If you plan on using SFS from the command line, the Command-line tutorial should be your next stop. Finally, you may find your questions addressed in the list of Frequently Asked Questions.